PHOTOSHOP REPLACES TILT SHIFT LENSES
New tech beats old tech, costs less and takes up zero space in a camera bag.
Author AndrewS
Introduction My interest in writing this piece was stimulated by several threads on the dpreview.com Micro Four Thirds forum, asking about or lamenting the lack of tilt shift lenses for the M43 system.
Some History Many years ago, way back when an imaging sensor was called "film", I spent considerable time with large format 4x5 inch cameras, used mainly for landscape photos. I became adept at managing tilt, shift and swing to move the plane of focus in three dimensional space. Using large format was fun but the task of hauling all that equipment to landscape photo opportunities was a complete pain in the back so I downsized to 35mm film SLR's with tilt shift lenses. When I "went digital" all the film cameras and full frame lenses were sold off in the quest for an even more compact, lightweight kit.
Film vs Digital sensor These two light sensitive device types have some very different characteristics. Film can readily accept light coming from an acute angle. This regularly happens when a tilt shift lens is moved to full shift position. Digital sensors have a completely different arrangement of light sensitive elements, each fronted by a microlens. Sensors of this type work best with light falling perpendicular to the surface of the sensor. They become increasingly inefficient as the incident light varies away from the perpendicular. This is one reason that shift movement in a lens is not well suited to digital imaging.
Digital sensors probably cope better with tilt which may explain the proliferation of third party tilt optics from makers such as LensBaby, which also makes tilt/shift versions. Many of these lenses fall into the "fun" category without serious pretension to being high grade landscape/architecture instruments.
About tilt shift lenses Serious tilt shift lenses intended for high quality photographs are large, heavy and very expensive. They are all manual focus single focal length types. Evaluating exposure with in camera meter systems can be difficult. Judging correct focus with tilt and shift applied can be difficult. Strange as it may seem I found working with lens shift and tilt easier with 4x5" large format. One learned to use an external light meter. Fine focus was much easier to evaluate on all parts of the frame with a magnifying loupe placed directly on the focussing screen.
Photoshop For many years Adobe Photoshop has provided some means for correcting vertical perspective in architectural photos taken with a standard lens pointed up or down. Increasingly sophisticated versions of this capability have now migrated to Adobe Camera Raw. This has made shift lens action unnecessary.
In more recent versions Photoshop has acquired a Focus Stacking feature. Initially this did not work terribly well but the version in Photoshop 13 [PsCS6] is very good and easy to use. Focus Stacking can do everything possible with tilt and in addition can achieve results which tilt cannot, making this technology now very useful.
 |
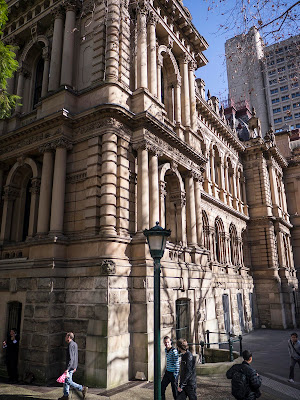
| Town Hall Original Photo |
 |
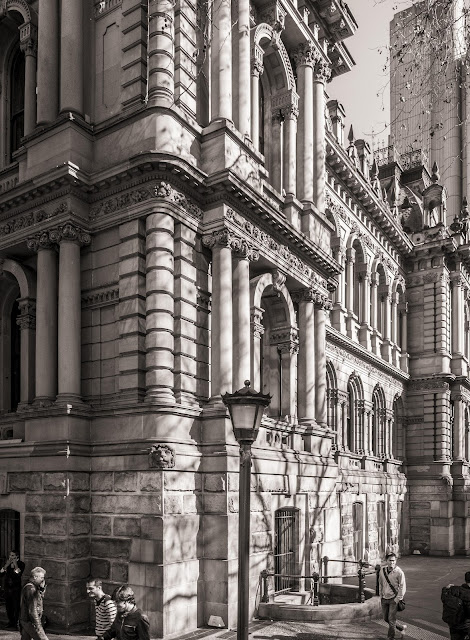
| Town Hall after changes in Adobe Camera Raw |
Perspective Correction in Adobe Camera Raw Hints for Image Capture
* Always use RAW capture.
* Use a tripod where possible for accurate framing. Having said that I often hand hold the camera when perspective correction will be required later in ACR.
* Leave space all around the main subject especially at the top, assuming a lens pointed up. More correction means more cropping.
* Try to identify a vertical line in the middle of the image and line this up with a vertical center guide line in the Monitor or EVF.
* If you are front on to a building and want to represent verticals and horizontals at right angles to each other, try to place the camera perpendicular to the center line of the planned final image.
Hints for using Adobe Camera Raw
* In ACR 7.4 go to Lens Corrections>Manual>Transform....
Check the Show Grid box.
If you know from previous experience that the lens needs distortion correction apply this, then apply vertical correction. Nudge the Rotate angle as required to keep the centerline verticals upright. Sometimes the Horizontal slider is required to adjust horizontal lines until they have the desired alignment.
The process is very sophisticated, easy to use and gives excellent results.
 |
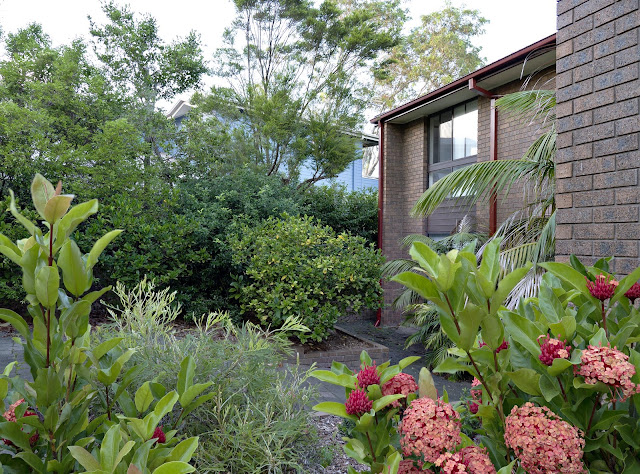
| This focus stack is a composite of five images |
Focus Stacking in Photoshop
While the Lens Corrections feature in ACR is readily understandable as the digital equivalent of shift in large format or a tilt shift lens, focus stacking is nothing like lens tilt at all. If a tilt/shift lens is tilted forward far enough the focal plane can be rotated from vertical (assuming the camera to be level) to horizontal, lying parallel to the ground. In this situation depth of focus occupies the vertical dimension, increasing with distance from the camera. For those who have never used a large format camera this might be difficult to imagine but that is how it works.
Hints for Image Capture
* Before starting do some research into the depth of focus available with your chosen lens at each focal length and aperture. You can find this at dofmaster.com I find it useful to commit this data to a small printed card which goes in the camera bag.
* Always use RAW capture.
* Always use a tripod. The process requires several photos of the subject each with exactly the same framing and exposure, changing only focus. Select a co-operative subject which needs to remain still during the multi exposure capture process.
* Use Manual Exposure. Use the same (low, there is no hurry) ISO, Aperture and Shutter Speed for each exposure. There is no need to stop down for depth of focus so use the lens at it's optimum aperture.
* Focus manually. This is essential for accurate control of the process.
* Make a series of exposures, starting with focus on the nearest part of the subject. Focus a little deeper into the scene for the next frame, and so on until you reach the background.
* Leave space for some cropping later.
 |
| Same location as the photo above, looking in the opposite direction. You can see here the focus stacking process has not delivered a perfect result. Some of the leaves near the left edge of the frame and on the right mid section are not sharp although they were so in one of the component images. |
Hints for using Photoshop
* Load your 3 to 8 (or thereabouts) images onto a separate folder so they are easy to manage. The number of frames is not critical but more frames will require more time and processing power to analyse.
* In Adobe Bridge, select the frames you want, then go to Tools>Photoshop>Photomerge.
* Up comes the Photomerge window. Select Layout, Auto. Uncheck the "Blend Images Together" box. Click OK. The program thinks for a while, message reads "align selected layers based on content" then an image appears on screen with the same number of layers as the number of frames selected.
* Select all layers.
* Go to Edit>Auto Blend Layers. Blend Method = Stack Images. Check the "Seamless tones and colors" box. Click OK. More computing takes place, after which the almost final composite image appears on screen.
* Inspect the image carefully at 100%, trim off any fuzzy edges, flatten layers and save the photo as a TIFF.
What just happened ? Manifestly, a miracle. Photoshop selected the sharp bits from each frame and blended just those sharp parts into a composite image with endless depth of focus in both the vertical and horizontal dimensions. This is impossible to achieve with a single exposure using large format or a tilt/shift lens.
For further information on focus stacking see
"Focus Stacking in Macro Photography" by Erez Marom, dpreview.com 11 April 2013, in Articles>Photo Techniques.